Development Guide
Git is a commonly used tool in software engineering. PyCharm is a popular IDE for Python, and developers can also choose other IDEs as they like. Now, we take PyCharm as an example. This setup with PyCharm makes it easy to work on all of AI4Finance-Foundation’s repositories simultaneously, while allowing easy debugging, committing to the respective repo and creating PRs/MRs.
Step 1: Download Software
-Download and install Anaconda.
-Download and install PyCharm. The Community Edition (free version) offers everything you need except running Jupyter notebooks. The Full-fledged Professional Edition offers everything. A workaround to run existing notebooks in the Community edition is to copy all notebook cells into .py files. For notebook support, you can consider PyCharm Professional Edition.
-On GitHub, fork FinRL to your private Github repo.
-On GitHub, fork ElegantRL to your private Github repo.
-On GitHub, fork FinRL-Meta to your private Github repo.
-All next steps happen on your local computer.
Step 2: Git Clone
mkdir ~/ai4finance
cd ~/ai4finance
git clone https://github.com/[your_github_username]/FinRL.git
git clone https://github.com/[your_github_username]/ElegantRL.git
git clone https://github.com/[your_github_username]/FinRL-Meta.git
Step 3: Create a Conda Environment
cd ~/ai4finance
conda create --name ai4finance python=3.8
conda activate ai4finance

cd FinRL
pip install -r requirements.txt
Install ElegantRL using requirements.txt, or open ElegantRL/setup.py in a text editor and pip install anything you can find: gym, matplotlib, numpy, pybullet, torch, opencv-python, and box2d-py.
Step 4: Configure a PyCharm Project
-Launch PyCharm
-File > Open > [ai4finance project folder]
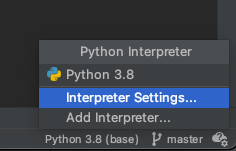
-At the bottom right of the status bar, change or add the interpreter to the ai4finance conda environment. Make sure when you click the “terminal” bar at the bottom left, it shows ai4finance.
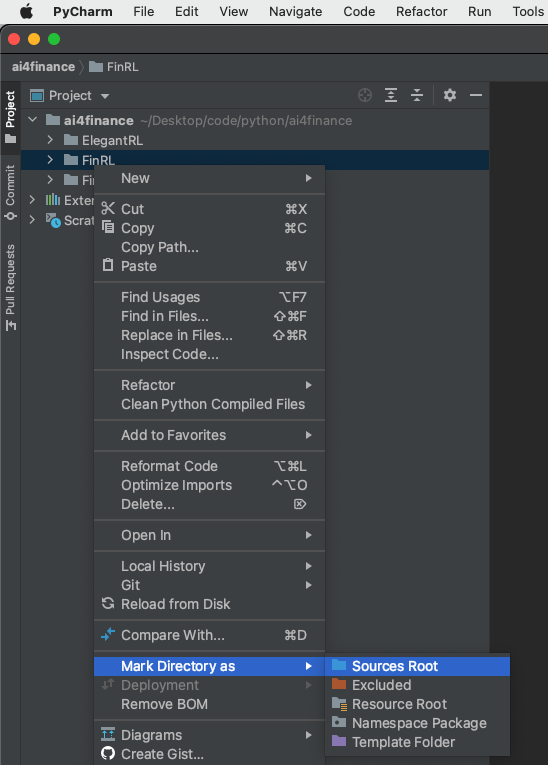
-At the left of the screen, in the project file tree:
Right-click on the FinRL folder > Mark Directory as > Sources Root
Right-click on the ElegantRL folder > Mark Directory as > Sources Root
Right-click on the FinRL-Meta folder > Mark Directory as > Sources Root
-Once you run a .py file, you will notice that you may still have some missing packages. In that case, simply pip install them.
For example, we revise FinRL.
cd ~/ai4finance
cd ./FinRL
git checkout -b branch_xxx
where branch_xxx is a new branch name. In this branch, we revise config.py.
Step 5: New a Branch
Please new a new branch based on branch “staging” (NOT “master”), which is for all developers. DO NOT directly push codes to the branch “staging” or “master”.
Step 6: Creating Commits and PRs/MRs
-Create commits as you usually do through PyCharm.
-Make sure that each commit covers only 1 of the 3 repo’s. Don’t create a commit that spans more than one repo, e.g., FinRL and ElegantRL.
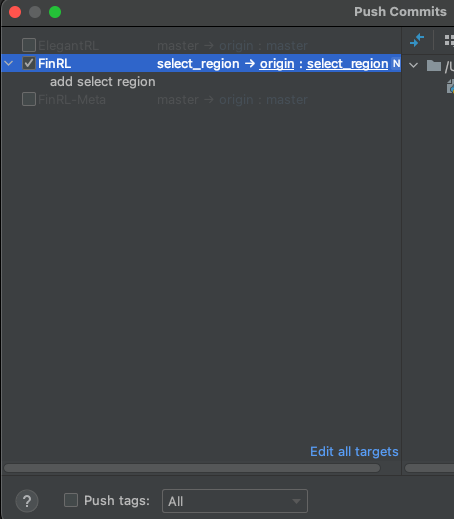
-When you do a Git Push, PyCharm will ask you to which of the 3 repos you want to push. Just like the above figure, we select the repo “FinRL”.
With respect to creating a pull request (PR) or merge quest (MR), please refer to Create a PR or Opensource Create a PR.
Step 7: Submit PRs/MRs
When submiting PRs/MRs, please choose the branch “staging”, NOT “master”.
Step 8: Merge “staging” to “master”
This step is for managers. If the branch “staging” is stable and works successfully after a series of tests, the managers of this repo will merge it to the branch “master” every 2-4 weeks. To avoid any risk, we hope managers download the “master” branch locally before merging.